You’ve worked with like-minded people towards a common goal: to create a film/video that will be shared with the world. It’s a fulfilling accomplishment. But now production is over, and it’s time to edit. If you are on a low-budget project, it’ll likely be you doing it. Much like a digital artist and blank Photoshop document, nothing fills me with grief than looking at an empty timeline. Even more, knowing that within a few hours it will be a giant mess. So, here is my video organization and editing workflow on Adobe Premiere Pro CC.
#1: Create a Master Project Folder
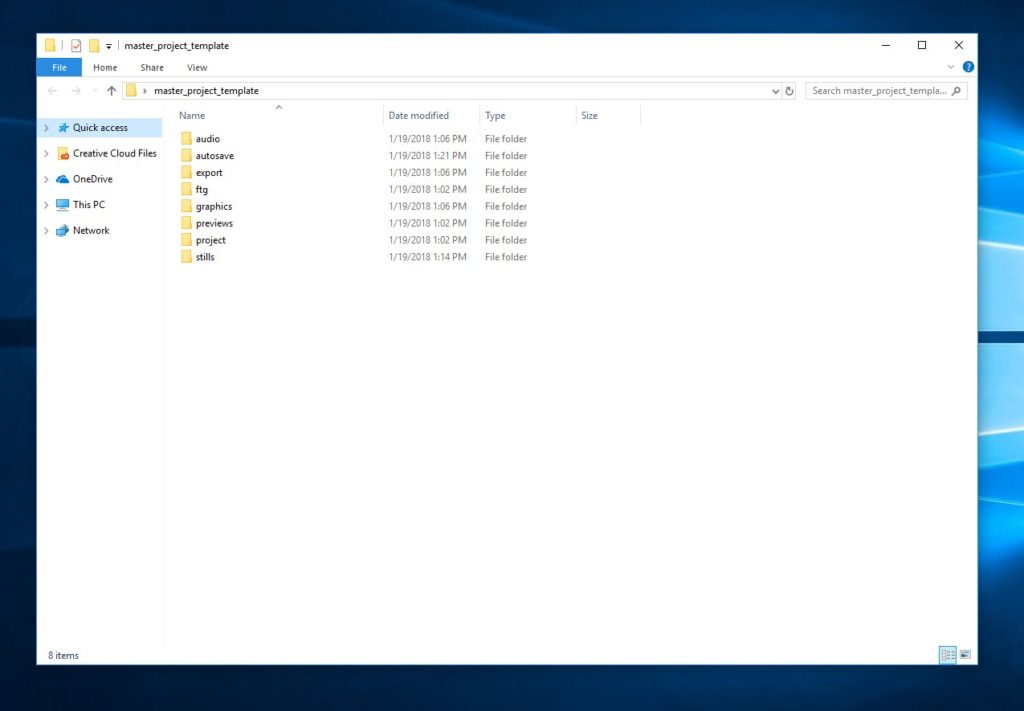
We’ve all been there, desperately looking for a specific picture in a sea of video, audio and graphic files. Mixing all of the your media together is a great way…to waste your time. Begin every project by creating a Master Project Folder; a folder containing your files that reside in their respective sub-folders. After the Master Project Folder is created, you’ll need to create a sub-folder for (almost) every file type you will be using. For example: pictures will go in the “stills/graphics” sub-folder, video in the “footage” sub-folder. You’ll also need to create sub-folders for “previews” and “auto-save” as well.
Note: I say “almost” because creating a folder for every little
thing will end up being counter-productive. You’ll find yourself looking for a
folder than the actual file. One-off files like scripts can go with the
“project” sub-folder. Separation is important, but so is simplicity…

#2: Organize footage in sub-folders
Wait, was this footage from Day 2 or 5 of production? If you’re dealing media from different days of production, it’s important to store that media separately. You can organize your footage based on a few attributes, such as:
- What is the context of the footage?
- What date was it shot in?
- Where was it shot?
- Is it an interview or is it B-Roll?
For example, if you shot a music video in different locations, separate the footage into sub-folders named after each location. That way if you’re looking for footage from Los Angeles, it’ll be in the “losangeles_scene” sub-folder. This is especially helpful when you’re looking for B-Roll. Some valid sub-folders include:
- Location
- Scene
- Date
- Interviews
- B-Roll
On a Mac (don’t judge me), you can also label files a specific color. This is also a valid way to decide which clips are good, which are B-Roll shots, and which aren’t usable. Then you can move those clips to a “best shots” folder if you’d like. Personally, I use the “blue” labels as B-Roll shots. “Red” for interviews or master shots. “Orange” for “golden shots”. And I leave the rest unmarked if deemed “unusable”. More on the meaning of the colors later on.
Organization within Premiere Pro
Making sure your Master Project Folder is in proper order will prevent you from having headaches during the editing process. But the organization doesn’t stop there: setting up bins, color coding and the hierarchical placement of media on the timeline are still crucial for effective organization.
#3: Creating the appropriate bins
Much like creating folders in your project folder, creating the necessary bins within Premiere Pro is essential to your workflow. Fortunately, you’ve created all of those folders will your content. So it’s as simple as importing all of the folders at once, and bam! There are your bins. But there may be some other bins you may want to make. I have a “sequence” bin in case I’m working with multiple sequences. While not mandatory, it can help keep your panel clean and organized.
#4: Color Coding (Labels)
Can’t stress it enough, labeling my content a unique color that corresponds to how I work on the timeline has helped me incredibly. As a default, Premiere Pro has a list of colors that can be used for your interpretation. But you can change the color and name of those defaults to best fit your workflow. Here is how I customized my labels with a brief description of what they are:
A-Roll (Interviews, Master Shot) – Red
B-Roll – Blue
Golden Shot (Best Shot) – Gold/Orange
Good Shot – Lime
Unusable – Black
Audio (Sound Effects, Music) – Deep Green
AE/VFX (After Effects/Special Effects) – Purple
Stills/Graphics (Pictures, Photoshop/Illustrator) – White
Color Correction/Grading (Adjustment Layer + Lumetri Color) – Cobalt
Sequences – Neon Green
Bins – White
All of the naming conventions are self-explanatory. It’s the colors displayed on the timeline that really help you visually see what is what. Some of the imported media will automatically use the correct color label in the project panel. But for some media like “B-Roll” and “AE/VFX”, you’ll need to color code manually. Unless you have already reviewed your content before importing to the project, this is also where you could look for potential “Golden” or “Good” shots in your footage. Now that you understand the way everything is color coded, it’s time to start laying down content on the timeline.
Organization on the timeline
If your timeline looks like it was hit by semi-truck and pieces were scattered everywhere, you’ll have a hard time figuring out what is what. There’s a way I look at the timeline in regards to the “A-Roll and “B-Roll”. A-Roll is the center on the video. It’s the narrative that drives the video forward. I call it “hot” content (hence why I labeled it red). Being that the story is core of the video, the A-Roll is in the core of the timeline (Video/Audio Track 1).
B-Roll is the “cold” content (again, this is why it’s labeled blue).
This is stuff that derives from or relates to the A-Roll. It’s placed above
the A-Roll on Video/Audio Track 2. Make note that A-Roll and B-Rolls audio
match the color of the footage.
That helps make sure I know what audio belongs to what clip. It can also
visually point out user errors. For example, if I accidentally place B-Roll
audio on the A-Roll’s audio track. Thus cutting out A-Roll’s audio.
Below that is the Audio. Music, sound effects and folly sound sit below audio from the video. Usually on Audio Track 4 or 5. This of course depends on how much audio you plan on using. The more audio that is played at once, the more tracks you will use on the timeline.
Color correction/grading goes on Video Track 3. I use a combination of the Adjustment Layer and Lumetri Color for every different shot. So if I have a 2 camera interview, I’ll use 2 different adjustment layers to color correct/grade both shots. If I use B-Roll of the same shoot, I’ll copy the adjustment layer over and make fine-tune adjustments if need be. Keep in mind, I color correction/grading after the edit is completed. So you might have Video Track 3 empty until you’ve finished your edit. But some people like to color correcting before making the edit. Which can save you A LOT of time in post.
On Video Track 4 and beyond is the Stills & Graphics (and/or After Effects/Special Effects). This could be a lower third, logo, picture, etc. Sitting on top of the color correction/grading layer to avoid messing with the colors of the graphics.
Above all else is a transition. Be it a film burn or custom After
Effects render, if you want the transition to work, it’ll be at the top of
the timeline.
Time Saver: Create a template.
So you’ve done all of the necessary organizational steps and the project is exported/completed. Now on to the next project! But you don’t feel like going through all of those steps again…
A template could help mitigate the tedious process of starting a new project. All you need to do is create a Master Project Folder Template with the sub-folder structure. From there, create a project with color coded bins. Save the project as “Video Project Template” in the “project” sub-folder.
When you need to start a new project, just copy the template, rename the project file name, open the project, reset the scratch disks and save. Now you’re steps ahead without that much effort!
This is be no means a “one size fits all” solution. But if organization is a concern for you. Or you’d like to try an alternative to your workflow, it doesn’t hurt to try something new.

Leave a Reply